

The short answer to this puzzling question is YES and NO.
Confused? Let’s break it down.
Technically, you can checkmate an opposing king with two knights but you can’t force checkmate with two knights.
There’s a huge difference in both scenarios. Let’s study this.
When is a Two Knight Checkmate Feasible?
You can achieve the two knight checkmate when the enemy king is at the board’s edge but your opponent must make a particularly silly blunder to allow you to mate them. In fact, they can only lose if they fails to notice a basic mate-in-one!
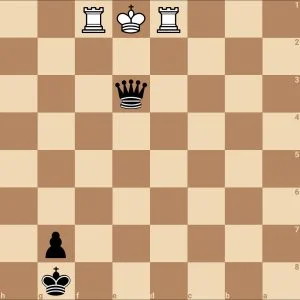
Consider the position below:

If White plays 1. Nf6+ and black makes a terrible blunder by moving to h8, then White plays 2. Nf7# effectively landing a checkmate with two knights.

But don’t assume that your opponent is dumb enough to fall into a silly mate in one move. You can only pray and hope but never rely on the two knight checkmate as a strategy in the endgame.
We’ve shown you positions where checkmate with the two knights are possible but as we mentioned earlier, you can’t force checkmate with them in an ideal situation.
Reason Why You Cannot Force Checkmate With Two Knights
Squares, not lines, are under the power of knights. Knights, unlike the queen, the rook, and the bishop, lose control of all the squares they were previously protecting when they move.
In other words, they are not long-ranged pieces. Imagine an endgame opposition between kings at the centre of the board — say maybe on d4 and d6 squares.

They obviously cannot advance towards each other, but they have squares by their sides and behind that they can move to.
Now, if one of the kings is forced to the edge of the board — maybe Black king on d8, and the White king is on d6, Black can no longer retreat to squares behind it.

White now has to worry about the squares on the side that the opposition cannot control. Typically, a king on d8 opposed by a king on d6 has c8 and e8 as his flight squares.
But if a White knight bars the king from using the c8 flight square, there’s just the e8 square left to scramble for safety.

Unfortunately, if the e8 square is also barred by another white knight, we’d be looking at a stalemate position. So, there goes our two knights.
And if any of those two knights neglect their duties (guarding the enemy flight squares) to deliver a check, the king could always scamper to the relieved flight square.
In such a case, a move rule draw could settle things if a threefold repetition doesn’t beat it to the punch.
Why don’t we take a look at what happens when the king has just one flight square?

While the king and two knights can force the lone king close to a corner, they can’t trap him in the corner without causing a stalemate or letting him flee.
Remember our previous illustration on the opposed king having two flight squares? Well, imagine a flight square is barred permanently by one knight, while the other knight forces the king to the only available flight square.
In the position above, the knight on e6 bars the Black king from moving to the f8 square and escaping to the queenside. The Black king can’t also move to f7 or h7 because of the presence of the White king.
That leaves the knight on f5. This knight needs to be the one to deliver the final checkmate but that’s the problematic aspect.
Wherever the second knight decides to land on, either on f6 or f7, it merely checks the Black king which can move to the only available flight square.
If the second knight defiantly chooses to use a check to claim the g8 square and force the king to h8 or maneuver to prevent the return of the king on h8 to g8, we’ll see a stalemate.

Tips To Avoid Falling To The Two Knights Checkmate
If you happen to have a game where it’s possible to hand over just two knights to your opponents in a bid to save your position, I recommend you do it.
Why? The resulting position is generally drawish.
But how do you ensure that you don’t misplay the position and get mated by the two knights?
Here are some important tips:
- Maintain a safe distance from the opposing king.
- Try to threaten a knight that threatens you.
- Avoid getting cornered to the edge of the board.
- Always keep your eye on the centre (e4, d4, e5, d5)

In the example above, Black king should avoid being passive and get active by attacking the knights in the centre of the board if possible.
It’s wise to follow these simple principles because getting in close proximity with the opposing king limits flight squares.
Always remember that limited squares increase the probability of checkmate.
Concluding Thoughts
Understanding the two knights checkmate effectively means that you know you should avoid terrible blunders that could lead to a painful loss, in what should have been a drawn game.
You can as well choose to save yourself the stress once you understand that a checkmate with two knights cannot be forced (unless you’re playing with a total noob, of course :)).


join the conversation