
The queen and king checkmate happen frequently in chess games.
Many games conclude in King + Queen vs. King, with the player in possession of the queen having to follow the Queen and King checkmate pattern to win.
Using the queen and her king, this pattern works by carefully limiting the opponent’s king to fewer ranks or files.
The lone king can receive its final blow by placing the guarded queen directly in front of it.

Alternatively, the queen can be placed on the opponent’s king solitary file or rank, with the dominant king occupying the oppressed king’s flight squares.

We’ll evaluate an example to arm you with the correct ideas required in carrying out this mating operation with ease.

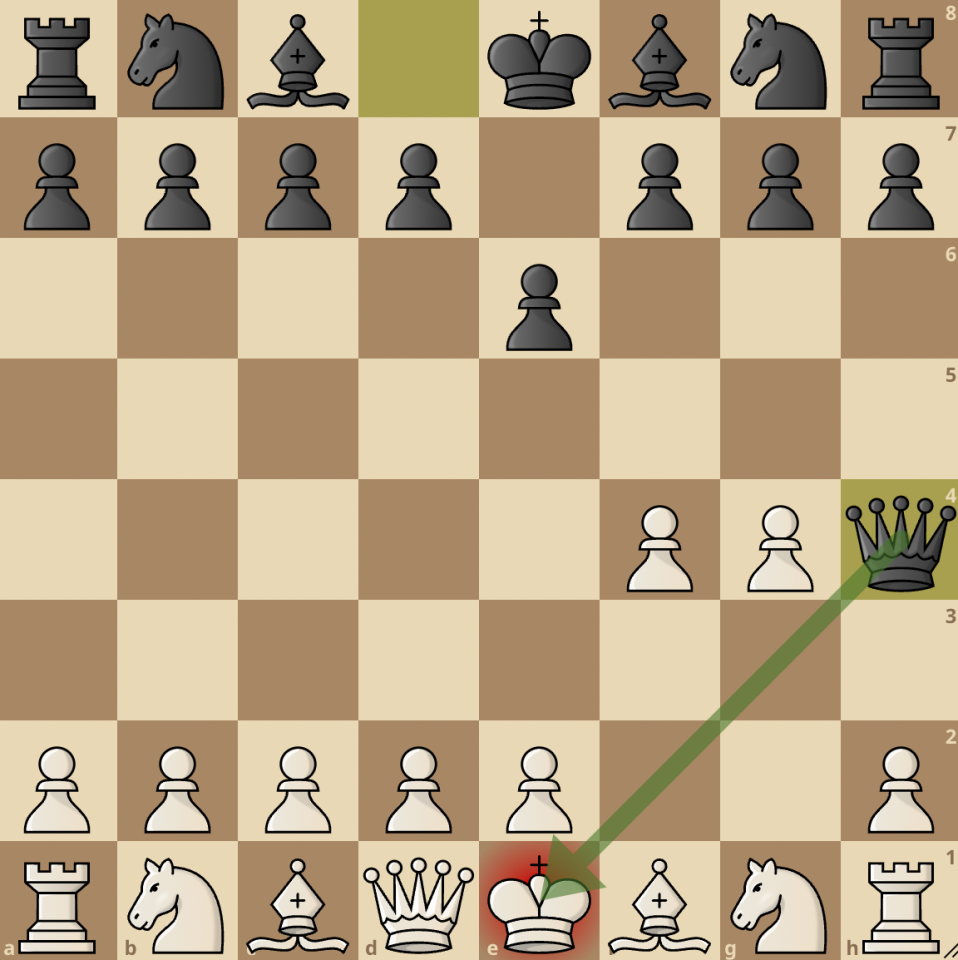
We have a King + Queen vs. King situation in the position above. To defeat black, White must follow the correct queen and king checkmate pattern.
When it comes to mating the opponent’s king, there is a general principle you should know.
The principle states: MATE CANNOT HAPPEN AT THE CENTRE OF THE BOARD, SO THE KING MUST BE PUSHED TO THE EDGE.
The reason for this rule is that moving the king to the edge reduces the number of flight squares available to the king, making queen and king checkmate more possible.
This forceful quarantine of the enemy king requires the use of both files and ranks when the fighting king is not within range.
Beware, the queen must be careful not to allow the king slip out of the enclosing cell of squares. This mistake usually occurs when the attacking player is tempted to deliver irrelevant checks.
Delivering checks repeatedly for a long time can ruin the queen and king checkmate with a draw: either by repetition or by move rules.
Let’s get back to our initial position.
White can start with 1. Qd7!

With this stealthy move, the black king’s access to flight squares is immediately taken away. In other words, the black king is forced to move to f6, which is the only vacant square.
1…Kf6 2. Kf4

White pushes his king steadily, forcing the opponent’s king to the edge of the board.
2…Kg6 3. Qe7 denying the black king any useful flight squares
3…Kh6

(3… Kh5 would have resulted in a more rapid mate with 4. Qg5#)
White may now immediately oppose the king and force in mate in two moves because the king has been pushed to the last file.
4. Kf5 Kh5 This is Black’s only move
5. Qg5#

If White wanted, he could also choose to deliver mate on h7 with Qh7#.

Avoid Stalemate
In trying to checkmate your opponent, you should as much as possible avoid stalemate. Beginners fall to this trap frequently.
Stalemate happens when the opposing king is out of material, and can’t move because the attacking side covers all squares. You can learn more in our stalemate vs checkmate piece.
Let’s talk about the example shown above.
The first stalemate threat occurs when the enemy king sits in one of the corner squares. In this case, it is crucial not to place your queen a knight’s move away from that corner.
This is what we mean:

In the diagram above, the White queen prevents the Black king from having any legal moves because it sits a knight’s move away from the a8 square, on c7. It would also be a stalemate if the queen were on b6.
The easiest way to avoid this stalemate is to make sure the enemy king has at least two safe squares before trapping it in a corner. For instance, if the White Queen were on d7, the Black king could harmlessly shuffle back and forth between a8 and b8.

In summary, the king and queen vs king checkmate pattern is quite easy if you follow the steps we outlined above. Remember to keep cutting the squares of your opponent’s king till it gets to an edge.
Once you achieve that, checkmate follows.
Remember to watch out for stalemate. You don’t want to spend hours getting a totally won position only to draw it because of one or two mistakes.


join the conversation